Hive JavaScript Tutorial : Hive Power Delegation
An important part of HIVE blockchain is HivePower. It is the influence users has and which gives them different voting power. Your stake will determine your vote power. There are many users that do power up and then delegate to their curation account. This tutorial will explain how to power up liquid Hive and delegate to another account or undelegated.
I believe this tool will be useful for people that want to know more on the backend of HIVE blockchain. I will be interacting with the HiveJS API as usual in this tutorial.
- Level of Difficulty : Intermediate
- IDE used : Sublime Text
- Languages : JavaScript, HTML, CSS
- HIVE JavaScript API docs : https://gitlab.syncad.com/hive/hive-js/tree/master/doc
I will guide you through the tutorial and explain every part in a way that a newbie will understand and want to try it out. We will be interacting with the HIVE chain JavaScript library to delegate HIVE Power and undelegated Hive power.
Step 1 : HTML structure
The first step is to create the foundation of what we will build on. We will create the HTML structure of our HIVE delegation tool. We need 4 input fields which will accept inputs for the delegator’s name, delegatee’s username, private active key, and the hive power amount. Then there will be a button to delegate when all necessary details have been put in. The first thing is to set your HTML specifications in the opened sublime text by typing in the below code
<!DOCTYPE html>
<html>
<head>
    <title></title>
</head>
<body>

</body>
</html>
Then you can put the below code inside the body tag.
        <div class="mypage">
        <h1><center>HivePower Delegator</center></h1>


        <input id='delegatee' type='text' placeholder="Delegatee Username"></input>
        <input id='delegator' type='text' placeholder="Delegator Username"></input>
        <input id='wif' type='password' placeholder="Private Active Key"></input>
        <input id='hivepower' type='number' placeholder="Hive Power"></input>
        <center><input type="button" value="DELEGATE" id='button'/></button></center>
    </div>
The code above shows that I used inputs and used the type attributes to distinguish from the text and password field. The password type attribute is needed in order to turn whatever details there into asterisks. All the inputs were assigned id’s which will be used in the CSS part and also in the JavaScript part. The inputs were also given placeholders to let users see information about each field before inputting any details. The button input type was also added which will serve as the button to click which will in-turn trigger the delegation. The button input holds the value DELEGATE.
All the inputs were wrapped in a div called mypage.

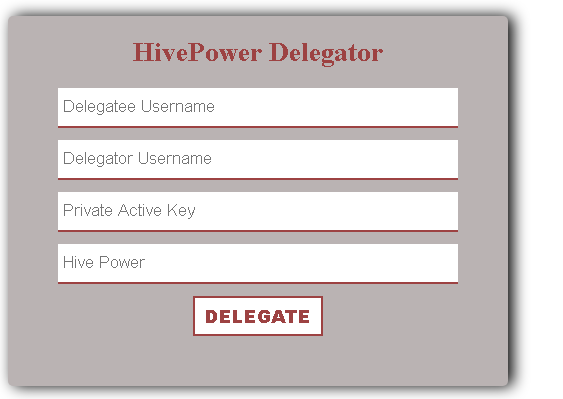
The above image shows the way our HTML page displays in the browser. It shows we need to style it further. This will be done in the CSS section to make it more appealing to the end-user.
Step 2 : CSS styling
Our CSS code will also be in the HTML file. We only need to specify the style type in the head section of our code by using <style type="text/css"></style>. This will ensure that any code that goes in there have effect in our HTML code.
There is not much difference in the CSS code compared to the HIVE voting tool in my last tutorial .
I used the same selectors which is the input types to apply similar settings to the HTML structure. Please refer to the last tutorial CSS section here to avoid duplicate tutorials.
The only difference is the
#delegatee:hover, #delegator:hover, #wif:hover, #hivepower:hover {
           border: 2px solid #9D4242;
       }
The input type id’s are delegate, delegator, wif, and hivepower. The code above only shows what to do when the end-user hovers on them. It translates to a solid border of 2px with color #9D4242 should display when any of the input is hovered on.
That mean we are done with the CSS and ready to move to JavaScript part.
You can see how it looks like now in the browser.
Step 3 : JavaScript
We have now designed the delegation tool and it can’t function because we haven’t added any functionality to it. This is where we will implement the HIVE JavaScript Library to interact with the HIVE blockchain.
We will set our JavaScript in the head section before our CSS script and just after the last html tag in our body tag using <script></script> in both. This is where our JavaScript code will go into.
We will not be installing any npm package on the system and that’s why we will use a Content Delivery Network (CDN) to connect to the HIVE JavaScript Library by typing in <script src="https://cdn.jsdelivr.net/npm/@hiveio/hive-js/dist/hive.min.js"></script> just above the CSS properties. The above means we have connected to the HIVE JavaScript minified library. Then we need to set some parameters before using the JavaScript APIs available to us.
<script>
        hive.api.setOptions({ url: 'https://anyx.io' });
        hive.config.set('address_prefix','STM');
        hive.config.set('chain_id','beeab0de00000000000000000000000000000000000000000000000000000000');
        hive.config.set('alternative_api_endpoints', ['https://api.hive.blog', 'https://anyx.io']);
    </script>
The above code sets the default RPC servers (nodes) to connect to and also include a fallback option in-case one of the nodes fail to work or respond. It also sets the chain id and address prefix.
This mean we can now start working with the HIVE APIs.
Let’s test if the connection is working by looking up all the accounts on HIVE. We use the get account API code in https://gitlab.syncad.com/hive/hive-js/tree/master/doc#get-account-count which is
hive.api.getAccountCount(function(err, result) {
  console.log(err, result);
});
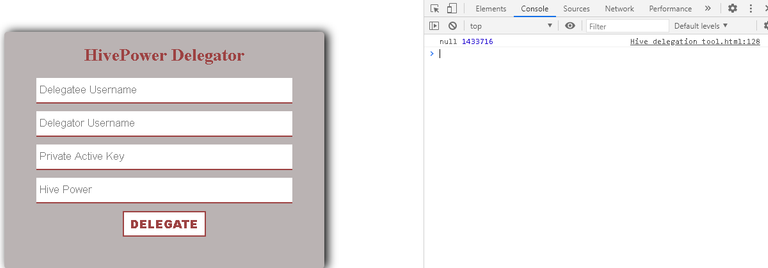
If you connect to the internet and reload the browser. Then, open console by right clicking anywhere on the page and click inspect then console. You will see the total number of registered accounts on hive which is currently 1433716 at the time of publishing this post. This shows our setup is ready.
Delete the getAccountCount code to get started with the delegation code.
The API code to delegate or undelegated is
hive.broadcast.delegateVestingShares(wif, delegator, delegatee, vesting_shares, function(err, result) {
  console.log(err, result);
});
- and wif stands for the private posting key
- delegator stands for the person that have the HivePower to delegate or undelegate
- delegate is the person receiving the delegation or undelegation
- vesting_shares is the HIVE POWER denominated in VESTS
These are the parameters we will link with our previously created page html and CSS styled page.
A function will be created titled delegateHP and all our JavaScript code will be placed inside the function scope. This is the function that will run once the DELEGATE button is clicked.
The next thing is to access the DOM by
var wif = document.getElementById('wif').value;
    var delegator = document.getElementById('delegator').value;
    var delegatee = document.getElementById('delegatee').value;
    var hp = parseInt(document.getElementById('hivepower').value);
The above code is used to assign whatever value that goes into the password, delegator, delegate, and hivepower field to be assigned to var wif, delegator, delegate, and hp respectively.
The parseInt parses a string and returns an integer. It basically converts the string to an integer. Normally, the number inputted in the hive power field will come out as a string and need to be converted to an integer by using parseInt.
The next part is where the bulk of the work is. It requires converting VESTS to HIVE Power.
According to Hive Developers here
Hive’s has base unit is VESTS and usually user doesn’t know about this unit because everything is dynamically calculated and presented in HIVE form for convenience of the user. In this recipe we will talk about how converting is working behind the scenes on all Hive apps. Dynamic Global Properties are used in this recipe to fetch the current values of global blockchain properties.
The above shows we can convert VESTS to Hive using
vestHive = ( result.total_vesting_fund_hive x availableVESTS ) / result.total_vesting_shares
The availableVESTS is the variable assigned to our hivepower input value. result.total_vesting_shares and result.total_vesting_fund_hive can be gotten from the Dynamic Global Properties.
This means we need to access the Dynamic Global Properties API since we need some information there. The Dynamic Global Properties API is
hive.api.getDynamicGlobalProperties(function(err, result) {
  console.log(err, result);
});
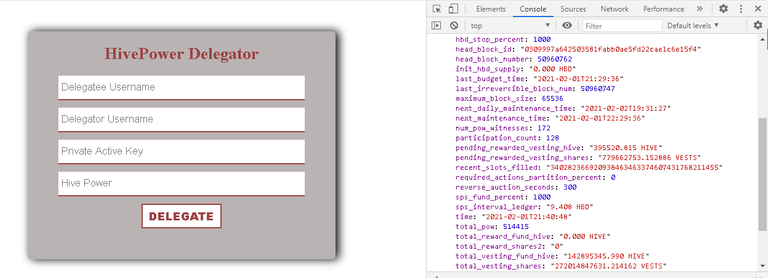
If you run it and view the result in the console, you will see things like content_reward_percent, current_aslot, current_hbd_supply, current_supply, current_witness, and many others. You will also see the total_vesting_fund_hive and total_vesting_shares which is required.
Now, we need to work on our Dynamic Global Properties API code to make it functional in the delegation tool.
   var delegatedHivePower = hp;
        var allHive = Number(result.total_vesting_fund_hive.split(' ')[0]);
        var allVests = Number(result.total_vesting_shares.split(' ')[0]);

        //Vests to Hive Calculator
        var hiveCalc = (allVests * delegatedHivePower) / allHive;
        hiveCalc = hiveCalc.toFixed(6);
        hiveCalc = hiveCalc.toString();
        var hpfinal = hiveCalc;
We split the result.total_vesting_fund_hive.split gotten from the dynamic global properties API to make it form arrays then selected the first data in the array by using [0]. Everything was then wrapped with the Number() function to converts the object argument to a number that represents the object's value. This is then assigned to variable allHive.
The same process was used for the result.total_vesting_shares and assigned to the allVests variable.
They will now be used for the conversion calculator which is (allVests * delegatedHivePower) / allHive; This means whatever the hivepower value is multiplied by the allVests and the answer divided by allHive. The result is assigned to a new variable called hiveCalc.
The hiveCalc is then attached to the .toFixed(6) method toFixed() which converts the number into a string and round it off the specified decimals which is 6. The .toString() method is also applied before finally assigning it to a new variable called hpfinal. This mean we are done with our Vests to Hive calculation and ready to run the Delegation API.
hive.broadcast.delegateVestingShares(
            wif,
            delegator,
            delegatee,
            hpfinal + ' VESTS',
            function(err, result) {
            if(err)
                alert('Delegation unsuccessful ' + err);
            else
                alert('The transaction is successfully carried out');
            console.log(err, result);
        });
The above code is a modified version of the Delegation API and it runs once the Delegate button is clicked. This means we need to apply an onclick event in our delegation button html code. It will now look like
<center><input type="button" value="DELEGATE" id='button' onclick="delegateHP()" /></button>
We now have a working delegation too that will report the error in case of unsuccessful delegation and a successful message if it goes through.
Our code is now fully done and functional.
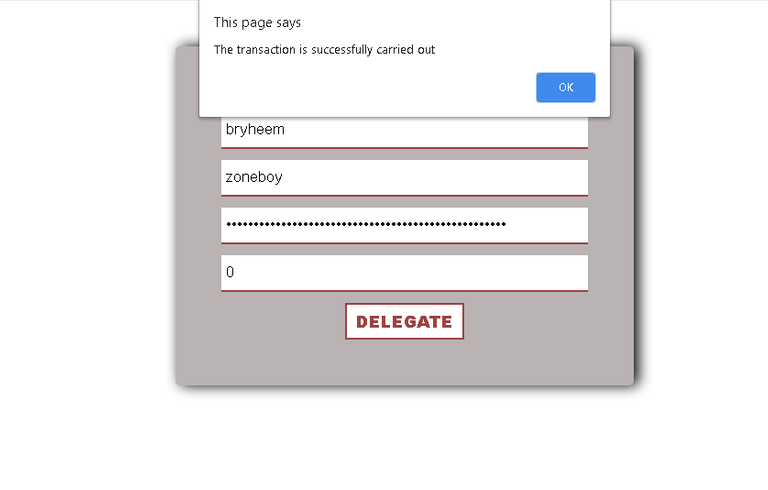
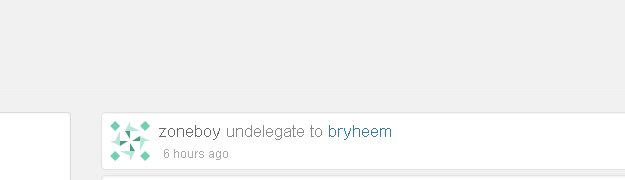
You can see my block explorer data of the code working. I undelegated 50 HivePower from bryheem.
The code can be viewed on https://github.com/zoneboy/delegate/blob/main/index.html
The code is also live on https://zoneboy.github.io/delegate/
I've always wondered how that was done. Thank you for sharing.
You are welcome. Good to see someone got the backend view behind the code.