Hive JavaScript Tutorial : Hive posting tool
HIVE blog is a social platform where users can interact via posting, voting, and commenting. The HIVE blog aspect cannot be removed from the HIVE blockchain. It is an integral part to the world of HIVE and one that lays the foundation for other DaPPS to be built on it.
This is why I will take you through the process of creating your own HIVE blog posting tool. You will learn how to make posting tool using the HIVEjs library. This tool will be useful for others that want to know more on the backend features of HIVE blockchain.
- Level of Difficulty : Intermediate
- IDE used : Sublime Text
- Languages : JavaScript, HTML, CSS
- HIVE JavaScript API docs : https://gitlab.syncad.com/hive/hive-js/tree/master/doc
I will guide you through the tutorial and explain every part in a way that a newbie will understand and want to try it out. We will be interacting with the HIVE-js library to post contents.
Step 1 : HTML structure
The first step is to create the framework of what we will build on. This is the HTML structure. We will create the HTML structure of our posting tool. We need 7 fields which are
- The author text field
- The posting key field
- The post permlink field
- The post Title field
- The post body field
- Then 5 fields that will contain the 5 tags.
- The Post button
The first thing is to set your HTML specifications in the opened sublime text by typing in the below code
<!DOCTYPE html>
<html>
<head>
    <title></title>
</head>
<body>

</body>
</html>
Then you can put the below code between the opening and closing body tag.
    <div class="mypage">
<h1><center>Create a Post on HIVE</center></h1>

   <input type="text" id="author" placeholder="Author (e.g. zoneboy)" />
   <input type="password" id="wif" placeholder="Private Posting Key" />
   <input type="text" id="permlink" placeholder="Unique Permlink (e.g. post-title)" />
   <input type="text" id="title" placeholder="Title" />
   <textarea placeholder="Content in Markdown or HTML" id='content'></textarea>
   <input type="text" id="tag1" placeholder="Tag 1 (Must start with a letter and end with letter or number)" />
   <input type="text" id="tag2" placeholder="Tag 2 Must start with a letter and end with letter or number)" />
   <input type="text" id="tag3" placeholder="Tag 3 (Must start with a letter and end with letter or number)" />
   <input type="text" id="tag4" placeholder="Tag 4 (Must start with a letter and end with letter or number)" />
   <input type="text" id="tag5" placeholder="Tag 5 (Must start with a letter and end with letter or number)" />
   <center><input type="button" value="PUBLISH" /></center>
</div>
The html code above shows everything wrapped in a div with class mypage.
The code above also shows that I used inputs and used the type attributes to distinguish from the text and password field. The password type attribute is needed in order to turn whatever text inputted there into asterisks. This will prevent anyone from physically seeing the password.
All the inputs were assigned id’s except the button input which will be used in the CSS part and also in the JavaScript part. The inputs were also given placeholders to let users see information about each field before inputting any details. I also added a textarea tag that will serve as the field to enter the post content. The button input type was also added. It serves as the button to click which will in-turn trigger the post publishing. The button input holds the value PUBLISH.
All the inputs were wrapped in a div called mypage.
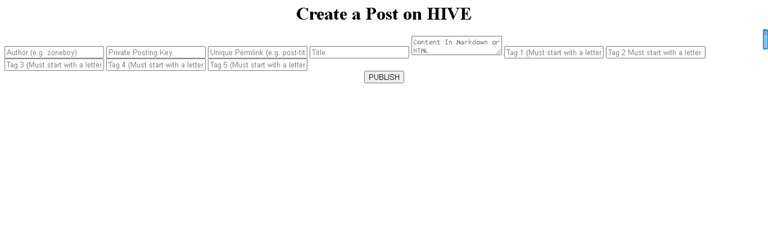
The above image shows the way our HTML page displays in the browser. It shows we need to style it further because it is not appealing to the eye. This will be done in the CSS section to make it more appealing to the end-user.
Step 2 : CSS styling
Our CSS code will also be in the HTML file. It won’t be external. We only need to specify the style type in the head section of our code by using <style type="text/css"></style>. This will ensure that any code that goes in there will affect our HTML code.
I started by applying box-sizing: border-box; to the universal selector before styling the mypage div.
.mypage{
   width: 800px;
   margin: 50px auto;
   padding: 50px;
   background: #BAB3B3;
   border-radius: 5px;
   box-shadow: 5px 0px 15px #000;
   -moz-box-shadow: 5px 0px 15px #000;
   -webkit-box-shadow: 5px 0px 15px #000;
}
The mypage div was assigned a width of 800px which means all other elements and tags will not exceed that width. The margin was modified to give a top and bottom margin of 50px with the left and right margin left at automatic. Little padding of 50px was added to make it more appealing to the eye and the background colour changed. Box-shadow was added to give a bit of solid appearance and the edges were curved with border-radius.
The heading 1 tag is the next thing to get modified with the by giving it a font size of 20pt, a font-weight of 800px, and assigning it a colour with paddings and margins.
.mypage input[type="text"], input[type="password"],
.mypage textarea
{
   display: block;
   width: 100%;
   font: 17px Arial, Helvetica, sans-serif;
   border: 0;
   border-bottom: 2px solid #9D4242;
   padding: 5px;
   margin-bottom: 12px;
   height: 40px;
   text-transform: lowercase;
}
The above code modifies the input type by changing the display inline to block and applying a width of 100% and adding paddings, margins, and borders. It also changes whatever text that goes into the field to lowercase. This is because, the author, permlink, and tags must be in lowercase. The text-transform: lowercase; therefore forces any text there into lowercase.
#title, #content {
   text-transform: none;
}
The next thing to be modified is the content and title field. We need to remove the forced lowercase by calling their ID’s and applying ‘text-transform: none;’ to it.
.mypage input[type="button"]{
   background-color: white;
   border: 2px solid #9D4242;
   display: inline-block;
   cursor: pointer;
   color: #9D4242;
   font-size: 18px;
   font-weight: 800;
   padding: 5px 10px;
}
.mypage input[type="button"]:hover {
   background: linear-gradient(to top left, #BAB3B3, #ffff);
}
The Publish button is the next thing to be styled. The background colour is changed with border added and the cursor change to pointer. A bit of margin is added to centralize the button with paddings.
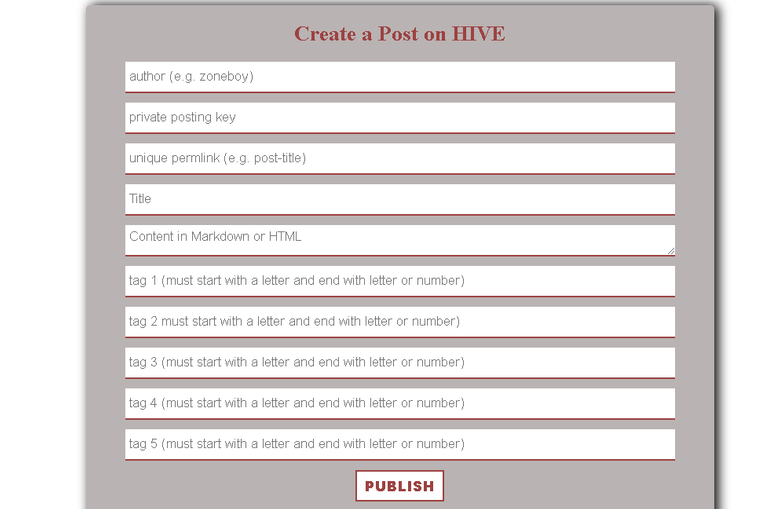
That concludes our CSS and you can see the way it displays in the browser below.
Step 3 : JavaScript
We have now designed the Hive posting tool but it can’t function because we haven’t added any functionality to it. This is where we will use the HIVE JavaScript Library to interact with the HIVE blockchain and make posts right from our newly created tool.
We will set our JavaScript in the head section before our CSS script and just after the last html tag in our body tag using <script></script> in both. This is where our JavaScript code will go into.
We will not be installing any npm package on the system and that’s why we will use a Content Delivery Network (CDN) to connect to the HIVE JavaScript Library by typing in <script src="https://cdn.jsdelivr.net/npm/@hiveio/hive-js/dist/hive.min.js"></script> just above the CSS properties. The above means we have connected to the HIVE JavaScript minified library. Then we need to set some parameters before using the JavaScript APIs available to us.
<script>
        hive.api.setOptions({ url: 'https://anyx.io' });
        hive.config.set('address_prefix','STM');
        hive.config.set('chain_id','beeab0de00000000000000000000000000000000000000000000000000000000');
        hive.config.set('alternative_api_endpoints', ['https://api.hive.blog', 'https://anyx.io']);
    </script>
The above code sets the default RPC servers (nodes) to connect to and also include a fallback option in-case one of the nodes fail to work or respond. It also sets the chain id and address prefix.
This mean we can now start working with the HIVE APIs.
The API code to make a post is
hive.broadcast.comment(wif, parentAuthor, parentPermlink, author, permlink, title, body, jsonMetadata, function(err, result) {
  console.log(err, result);
});
- and wif stands for the private posting key
- parentAuthor stands for the author of the post we are commenting on
- parentPermlink stands for the original post permlink
- author stands for our name. The poster name
- permlink is the permanent url for the comment you want to make
- the post title
- the body of the content
- the jsonMetadata means additional tags, links present in the post, app name for the post.
These are the parameters we will link with our previously created page html and CSS styled page.
An adjustment will be made to this api code to suit our need.
A function titled publish will be created and all our JavaScript code will be placed inside the function scope. This function will run once the PUBLISH button is clicked.
The next thing is to access the DOM
   var wif = document.getElementById('wif').value;
   var blank = '';
   var firstTag = document.getElementById('tag1').value;
   var secondTag = document.getElementById('tag2').value;
   var thirdTag = document.getElementById('tag3').value;
   var fourthTag = document.getElementById('tag4').value;
   var fifthtag = document.getElementById('tag5').value;
   var author = document.getElementById('author').value;
   var permlink = document.getElementById('permlink').value;
   var title = document.getElementById('title').value;
   var content = document.getElementById('content').value;
The above code is used to assign whatever value that goes into the wif, tag1, tag2, tag3, tag4, tag5, author, permlink, title, and content field to be assigned to var wif, firstTag, secondTag, thirdtag, fourthTag, fifthTag, author, permlink, title, content respectively. The var blank is assigned an empty string since it’s the parent authors own.
The only thing left to modify the comment api code as seen below.
hive.broadcast.comment(
wif,
blank,
firstTag,
author,
permlink,
title,
content,
// json metadata (additional tags, app name)
{ tags: [secondTag,thirdTag,fourthTag,fifthtag],
app: 'zoneboy/v1.0' },
function (err, result) {
if (err)
alert('Error posting ' + err);
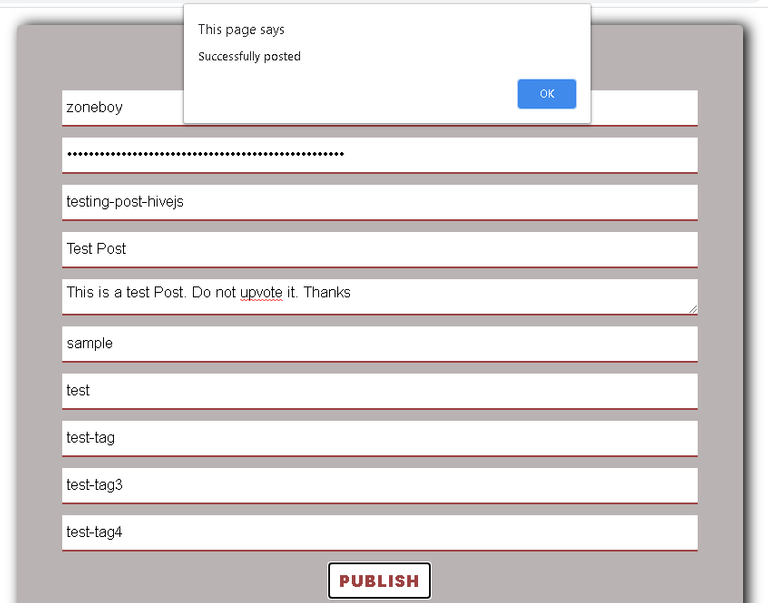
else
alert('Successfully posted');
}
);
The above api comment code accepts wif, blank, firstTag, author, permlink, title, and content variables. The jsonMetadata was also modified to accept 4 extra tags and app name app: 'zoneboy/v1.0' }, . The function was concluded with an if-else statement that alerts Error posting plus the error message if post is not successfully posted. It also alerts Successfully posted if there is no error and the post got published.
We then need to go back to the PUBLISH button in our HTML and attach the onclick attribute to trigger the publish function which we just created . The input button type will now look like <center><input type="button" value="PUBLISH" onClick='publish()'/></center>
We now have a working posting tool that will report the error in case of any incorrect information
Our code is now fully done and functional.
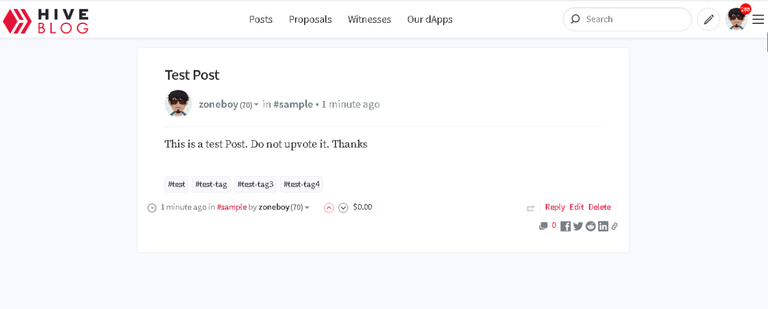
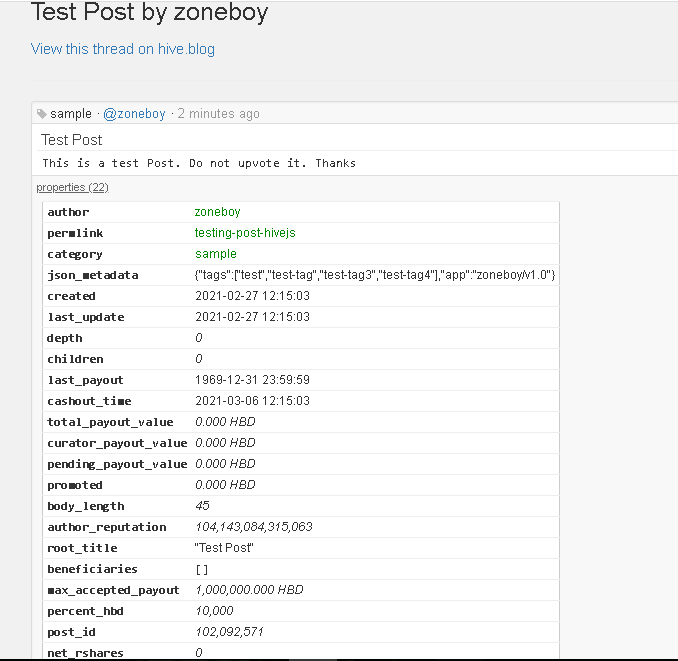
You can also see my block explorer data of the dummy post I made. You can see the app name there too.
The code can be viewed on https://github.com/zoneboy/hive-post/blob/main/index.html
The code is also live on https://zoneboy.github.io/hive-post/
Check out my previous tutorial
HiveJs post upvote tutorial
Hive JavaScript Tutorial : Hive Power Delegation
Hive JavaScript Tutorial : Hive/HBD transfer tool
This is great, thanks for taking the time to document.
Thank you. I appreciate.
https://twitter.com/iamtaofeek/status/1365689659498627079
You're so amazingly brilliant bro.
Thank you for this.
This is nice. You are truly advancing in programming. Great content
Thank you. Still learning. I hope to combine everything together to build something huge here.
I want to apply as your student. What do you say? 😒
Ah ah. I am also a student. Still learning.
Thanks for your contribution to the STEMsocial community. Feel free to join us on discord to get to know the rest of us!
Please consider supporting our funding proposal, approving our witness (@stem.witness) or delegating to the @stemsocial account (for some ROI).
Thanks for using the STEMsocial app, which gives you stronger support. Including @stemsocial as a beneficiary could yield even more support next time.
How to beneficiaris?