HIVE JavaScript API tutorial: Post upvote tutorial
Many friends do ask me how they can vote people at certain percentage on hive.blog . Unlike peakd , hive.blog doesn’t show the vote slider for all users. You need a certain amount of Hive Power for it to show. This made me look into creating a simple interface where users can input their username, their posting key, the post they want to upvote, and the vote weight.
I also believe the tool will be wonderful for manual curators who haven’t automate their curation. They can easily create the list of all posts to be voted and curate them easily. It takes just 3 seconds to send a vote and the interface we will create is intuitive.
- Level of Difficulty : Intermediate
- IDE used : Sublime Text
- Languages : JavaScript, HTML, CSS
- HIVE JavaScript API docs : https://gitlab.syncad.com/hive/hive-js/tree/master/doc
I will guide you through the tutorial and explain every part in a way that a newbie will understand and want to try it out. We will be interacting with the HIVE chain JavaScript library to broadcast our vote.
Step 1
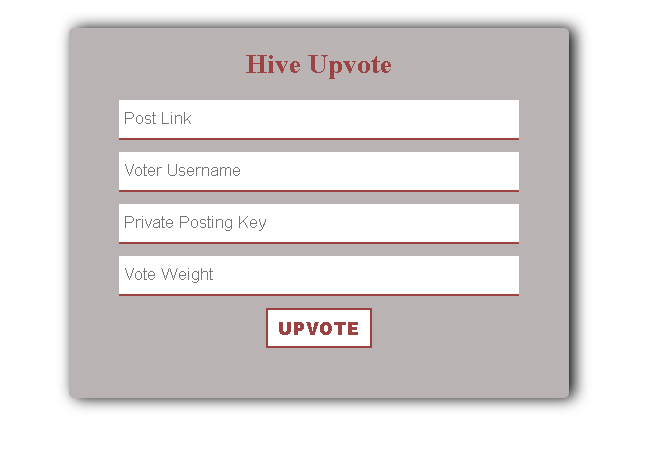
The first step here is to create the framework of what we will build on. We are going to create the HTML page of our HIVE upvote tool. We need to design a HTML page that will accept inputs for post link, voter name, posting key, and vote weight. Then there will be a button to vote when all necessary details have been put in.
<div class="mypage">
        <h1><center>Hive Upvote</center></h1>


        <input id='permlink' type='text' placeholder="Post Link"></input>
        <input id='voter' type='text' placeholder="Voter Username"></input>
        <input id='wif' type='password' placeholder="Private Posting Key"></input>
        <input id='weight' type='number' placeholder="Vote Weight"></input>


        <center><input type="button"  id='button' /></button></center>
    </div>
The code above shows that I used inputs and used the type attributes to specify which fields are type and which field is password. All the inputs were given id which will be used to design them and also in the JavaScript session. The inputs were also given placeholders that let users see information about them before inputting any details. All the inputs were wrapped in a div called mypage.

You can see the way it displays in the browser. It shows that it needed to be finetuned. This is why we will go to the CSS section to add some properties and value to it which will make it more appealing to the users.
Step 2
Our CSS section will also be in the HTML file. We just need to specify the style type in the head section of our code to make it effective using <style type="text/css"></style>. Then use the universal selector ***** to set the box-sizing to border-box.
The first thing is modifying the mypage div holding our inputs together and that is by applying width, margin, background color, border radius and box-shadow.
* {
            box-sizing: border-box;
        }
        .mypage {
            width: 500px;
            margin: 50px auto;
            padding: 50px;
            background: #BAB3B3;
            border-radius: 5px;
            box-shadow: 5px 0px 15px #000;
            -moz-box-shadow: 5px 0px 15px #000;
            -webkit-box-shadow: 5px 0px 15px #000;
        }
You will notice that we have the box-shadow, moz-box-shadow, and webkit-box-shadow in the code above. This is to allow most browsers version to support the box-shadow property and its value.

You can see from the image above that we still need to work on our code because the text fields are not displaying well. Let’s work on that.
Our CSS code is now complete and we have styled the inputs, the button, and even added the UPVOTE value to the button so it has a form of text in it.
.mypage h1 {
            color: #9D4242;
            font-size: 20pt;
            font-weight: 800;
            padding: 10px;
            margin: -40px -30px 10px;
        }
We started by modifying the heading tag to make it more appealing. The color, font size and the font weight which determines how bold it is was added. Padding was also added to the sides and a margin of -40px to the top -30px to both sides and 10px to the bottom.
.mypage input[type="text"],.mypage input[type="number"], input[type="password"] {
            display: block;
            width: 100%;
            font: 17px Arial, Helvetica, sans-serif;
            border: 0;
            border-bottom: 2px solid #9D4242;
            padding: 5px;
            margin-bottom: 12px;
            height: 40px;
        }
        #permlink:hover, #voter:hover, #wif:hover, #weight:hover {
            border: 2px solid #9D4242;
        }
The next thing is styling the input types to look better and we need to change the display to block. This will make them occupy a line with no interference whatsoever. Then the width is set to 100% and border removed but leaving only the bottom border. Margin bottom of 12px was added to leave some space between each input. The styling was rounded off with the height assigned to each input field. The next thing to style is how the input fields behave when hovered on. A round solid border with color was added to it.
.mypage input[type="button"] {
            background-color: white;
            border: 2px solid #9D4242;
            display: inline-block;
            cursor: pointer;
            color: #9D4242;
            font-size: 18px;
            font-weight: 800;
            padding: 5px 10px;
        }
        .mypage input[type="button"]:hover {
            background: linear-gradient(to top left, #BAB3B3, #ffff);
        }
The button is the next thing and before styling it, we need to add some text to the HTML button by adding value=”UPVOTE” which makes the code look like <center><input type="button" value="UPVOTE" id='button'/></button></center>. The background color was changed and display was changed to inline-block with cursor changed to pointer. The font-size and weight values were modified as well as padding added to it.
That mean we are done with the CSS and ready to move to JavaScript part.
You can see how it looks like now.
Step 3
We have only designed our upvote tool, we need to add functionality to it. It need to be able to vote any link put there. This can be done by implementing the HIVE JavaScript library where we will interact with the HIVE blockchain.
We will set our JavaScript in the head section and just after the last html tag in our body tag using <script></script>. This is where our JavaScript code will go into.
We will not be installing any package on the system and that’s why we will use a CDN to connect to the HIVE JavaScript Library by typing in <script src="https://cdn.jsdelivr.net/npm/@hiveio/hive-js/dist/hive.min.js"></script> just above the CSS properties. The above means we have connected to the HIVE JavaScript minified library. We need to set some parameters before using the JavaScript APIs available to us.
<script>
        hive.api.setOptions({ url: 'https://anyx.io' });
        hive.config.set('address_prefix','STM');
        hive.config.set('chain_id','beeab0de00000000000000000000000000000000000000000000000000000000');
        hive.config.set('alternative_api_endpoints', ['https://api.hive.blog', 'https://anyx.io']);
    </script>
The above code sets the default RPC servers (nodes) to connect to including a fallback option incase one doesn’t work. It also sets the chain id and address prefix.
This mean we can now start working with the HIVE APIs.
Let’s test this by looking up all the accounts on HIVE. We use the get account API code https://gitlab.syncad.com/hive/hive-js/tree/master/doc#get-account-count which is
hive.api.getAccountCount(function(err, result) {
  console.log(err, result);
});
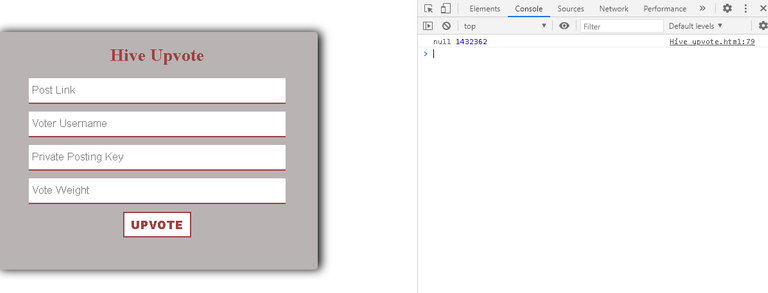
If you connect to the internet and reload the browser. Then, open console by right clicking anywhere on the page and click inspect then console. You will see the total number of registered accounts on hive which is currently 1432362 at the time of publishing this post. This shows our setup is ready.
Delete the getAccountCount code to get started.
The API code to vote is
hive.broadcast.vote(wif, voter, author, permlink, weight, function(err, result) {
  console.log(err, result);
});
- and wif stands for the private posting key
- voter stands for the user voting
- author
- permlink stands for the text and symbols appearing after the
@username
These are the things we will link with our previously created page html and CSS styled page.
A function will be created which I titled myUpvote and all our JavaScript code will be inside this function. This is the function that will run once the UPVOTE button is clicked.
We will make a slight modification of the Vote API code to turn it to
hive.broadcast.vote(wif, voter, author, permlink, weight, function(err, result) {
                if(err)
                    alert("Fail " + err);
                else
                    alert("Successfuly voted");
            });
This simply means if the vote fails, an alert should pop up and say fail followed by the error cause. If the vote is successful, an alert will pop up saying Successfully upvoted.
const wif = document.getElementById('wif').value;
const voter= document.getElementById('voter').value;
The above code is used to assign whatever value that goes into the password and voter username field to be assigned to Constant wif and voter respectively.
We need to grab the link pasted inside the post link field and split it. This will enable us to get our permlink from whatever hive.blog link dropped.The split will split the string into an array of substrings.
This mean if a link like https://hive.blog/hive-167922/@zoneboy/cryptocurrency-tutorial-for-newbies is put inside the post link field and the below code is run in a console
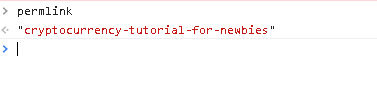
var pathArray = document.getElementById('permlink').value.split('/');
            var permlink = pathArray[5];
            console.log(pathArray);
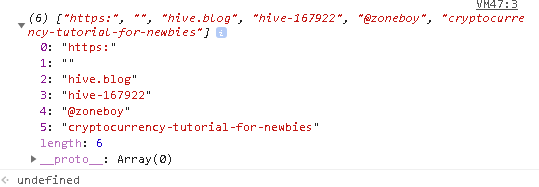
the above code will then return and array including the substrings as seen in the image above.
We can now select the 5th string which is our permlink and assign it to the permlink variable.
The next thing is extracting the post author using a similar method with the permlink but without the splicing. We just say
var postAuthor = pathArray[4];
var author = postAuthor.substr(1);
This means we are selecting the 4th array and assigning it to the postAuthor variable. We will then assign postAuthor.substr(1) to the author variable. When you look at our 4th array, you will notice it returned @zoneboy. This is why we need to extract @ away from it and leave only zoneboy. This is made possible with the substr() method. We simply specified 1 which is to remove the first letter of the string.
The next thing is setting the vote value. We will get the value of any figure inputted in the vote weight field.
var votevaluefinal = parseInt(document.getElementById('weight').value);
var weight = votevaluefinal * 100;
We will get the value and convert it Integer using parseInt. This will then be multiplied by 100 and assigned to our weight variable. The reason for multiplying by 100 is to enable us type use normal -100% to 100% for voting. The default weight ranges from -10000 (100% flag) to 10000 (100% upvote) and this can cause confusion when inputting vote weights.
Our myUpvote function is now done and the next thing is link with the UPVOTE button in our html code.
We just need to add onclick="myUpvote()" as an attribute to our UPVOTE button input type to make it look like
<center><input type="button" value="UPVOTE" id='button' onclick="myUpvote()" /></button></center>
Our code is now fully done and functional.
The code can be viewed on https://github.com/zoneboy/hive/blob/main/index.html
The code is also live on https://zoneboy.github.io/hive/

You can see my block explorer data of the code working. I downvoted and also voted a post with it.
Great tutorial , learnt a lot although I don't use JS that much . Ever think of doing one for python ?
!WINE
Cheers, @amr008 You Successfully Shared 0.100 WINE With @zoneboy.
You Earned 0.100 WINE As Curation Reward.
You Utilized 1/3 Successful Calls.
WINE Current Market Price : 10.000 HIVE
Thanks. I don't use Python. You can visit the official hive developers site to view more on Python tutorial.
https://developers.hive.io/tutorials/#tutorials-python
Thanks for your contribution to the STEMsocial community. Feel free to join us on discord to get to know the rest of us!
Please consider supporting our funding proposal, approving our witness (@stem.witness) or delegating to the @stemsocial account (for some ROI).
Thanks for using the STEMsocial app, which gives you stronger support. Including @stemsocial as a beneficiary could yield even more support next time.
Congratulations @zoneboy! You have completed the following achievement on the Hive blockchain and have been rewarded with new badge(s) :
You can view your badges on your board and compare yourself to others in the Ranking
If you no longer want to receive notifications, reply to this comment with the word
STOPCheck out the last post from @hivebuzz: