3D Printing: Bed Leveling and Z Offset
During recent back-and-forth replies with @print3dpro the basic theory of Z-offset and how it relates to print bed leveling was brought up. I think I understand the general idea and I am making a post about it. Both @print3dpro and I are new to 3D printing so any critique of this post from others who have more experience would be appreciated.
Z-offset proper is the distance between the hot end of the 3D printer's nozzle and the Z home position on the 3D printer. For my Tronxy XY-2 Pro it is the left-front point where all three axes converge at (0,0,0). Other FDM cartesian printers may have the Z home position on the right-rear corner.
If my printer's nozzle is set at 1.0 mm above the Z home position then my Z-offset is 1.0 mm whether or not my 3D printer's bed has been leveled. As matterhackers.com points out the process would more accurately be described as “tramming the 3D printer bed”. As the article points out if you use a spirit level on a properly "leveled" 3D print bed the spirit level probably wouldn't show the bed surface to be level. That is because the spirit level indicates whether or not the printer bed surface is horizontal to the ground (living room table or desk in my case). That doesn't matter since the bed can be slightly inclined and still have the first layer built upon properly as long as the nozzle is parallel across the entire surface of the print bed.
It's not the horizon leveling compensates. It's the vector of the print bed surface. As it states in the tronxyonline.com features for the auto-leveling sensor:
The self-leveling sensor is designed for 3D printers. It is widely used to measure the vector level and automatically adjust to the horizontal position.
It is used to measure the level of vector, so as to improve the printing accuracy of 3D printer.
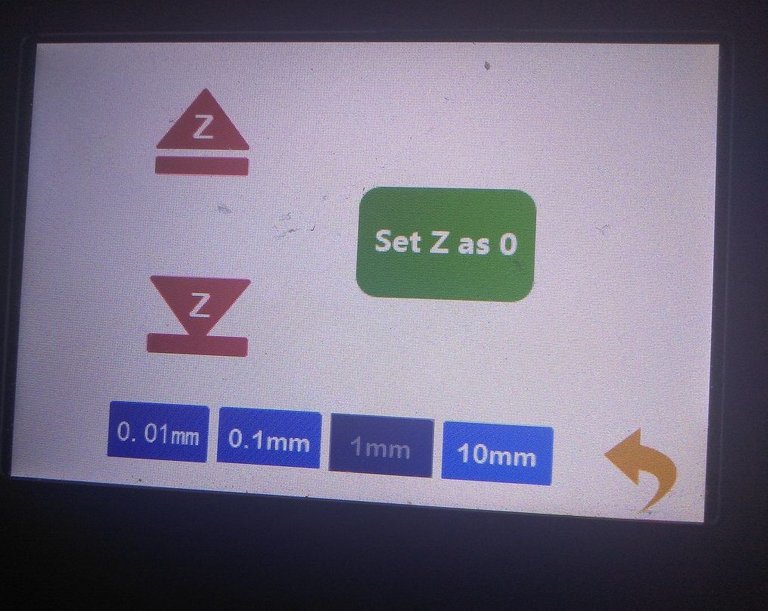
Image Source: Personal Photo
The print bed of my Tronxy XY-2 Pro measures 255 mm x 255 mm. That gives my print bed a surface area of 65025 mm². Technically there's a tiny bit of border the nozzle can't reach so it's really 65024 mm². When my printer does semi-automatic leveling it probes 16 different points of the print bed. Each number displayed on the printer's LCD screen represents an area of 4064 mm² on the print bed.
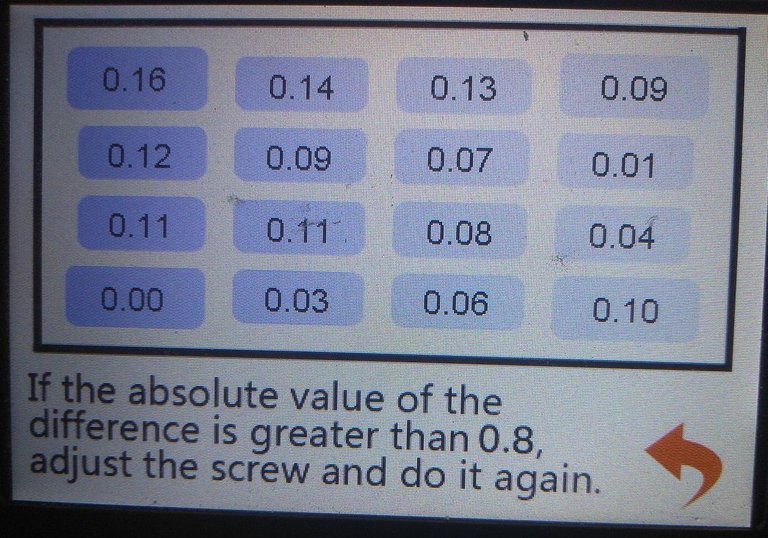
Image Source: Personal Photo
For my Tronxy printer the amount of error between the highest and lowest value must be less than absolute 0.8 to be "level". If it is more than that I must adjust the leveling knob at the corner represented by the outlier error values.
Since the bottom left corner number is always 0.00 I believe all the other error values are deviation measured in millimeters from the value of Z home. A negative value is below Z0 and a positive value is above Z0.
I suppose this has been a pedantic post about bed leveling. A lot of words to get the idea across that "bed leveling" is compensating for the surface of the print bed so it is treated as parallel to whatever the Z home position of the 3D printer is.
If you just want to extrude material directly on a printer bed the Z-offset should be somewhere around 0.06 mm – 0.2 mm above the bed in most cases. There are times when you'll want a higher Z-offset than that. The website all3dp.com gives two examples.
- Printing directly on top of an existing object (for example, printing directly on glass to make a picture frame)
- Embedding magnets inside a print (for example, by pausing the printer mid-print)
Hopefully this post has been useful. If I missed anything or got something wrong please post a comment below. Thank you.
Posted with STEMGeeks
My Thingiverse account: https://www.thingiverse.com/holovision/designs
My Thangs account: https://thangs.com/Holovision
3D printing community on Hive: https://peakd.com/c/hive-103035/created
Hi @holovision, This was a nice write up on 3D Printing: Bed Leveling and Z Offset.
It was not pedantic , and helped me get a clearer understanding.
My confusion with Z-offset is mostly in line with the Z limiter switch, and how this offset interacts with the stop point, but I get it now and was definitely overthinking it.
Z-offset for Klipper firmware I'm not sure how to code in for a permanent offset, but the Fluidd Pi control station I'm using has an easy to use feature for Z-offset right on the panel.
It just occurred to me to paper level hot, leaving a larger gap (serious issue I've been having with bed leveling, having to compress way too tightly to bed with nozzle, and this in effect, makes leveling so much harder to feel from a compression aspect.)
I'm going to leave a bigger gap and then utilize the Z-offset in this panel to adjust on the fly.
I feel a lot more confident about the Z-offset now, thanks a bunch for the comprehensive write up, the links were super helpful too.